Ball Bearing Tolerances Explained
Do you understand bearing tolerances and what they really mean? If not, you’re not alone. These are often quoted but often without any real understanding of what they mean. Websites with simple explanations of bearing tolerances are extremely rare so we decided to fill the gap. Many thanks to EZO in Japan for their help. So, if you want to know what “Mean Bore Deviation” and “Single Bore Variation” actually mean? Read on as we hope to make this much clearer.
Deviation
This dictates how far away from the nominal dimension, the actual measurement is allowed to be. The nominal dimension is the one shown in the manufacturer’s catalog e.g. 6200 has a nominal bore of 10mm, 688 has a nominal bore of 8mm, etc. Limits on the maximum deviation from these dimensions are extremely important. Without international tolerance standards for bearings (ISO and AFBMA), it would be up to each individual manufacturer. This could mean you order a 688 bearing (8mm bore) only to find that it is a 7mm bore and won’t fit the shaft. Deviation tolerances usually allow the bore or OD to be smaller but no bigger than the nominal dimension.
Mean Bore/OD Deviation
… or single plane mean bore diameter deviation. This is an important tolerance when looking to closely mate inner ring and shaft or outer ring and housing. First, you need to understand that a bearing is not round. Of course, it's not far off but when you start measuring in microns (thousandths of a millimeter) you realize the measurements vary. Let’s take the bore of a 688 bearing (8 x 16 x 5mm) as an example. Depending on where in the inner ring you take your measurement, you may get a reading of anywhere, say, between 8mm and 7.991 mm so what do you take as the bore size? This is where Mean Deviation comes in. This involves taking a number of measurements in a single radial plane (we’ll come to that in a minute) across the bore or OD to average out the diameter of that ring.
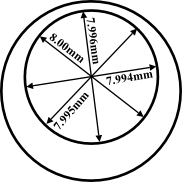
This drawing represents an inner bearing ring. The arrows represent various measurements taken across the bore in different directions to help discover the mean size. This set of measurements have correctly been taken in a single radial plane i.e. at the same point along the length of the bore. Sets of measurements should also be taken in different radial planes to make sure the bore is within tolerances along its length. The same applies to outer ring measurements.
This diagram shows how NOT to do it. Each measurement has been taken at a different point along the length of the bearing ring, in other words, each measurement has been taken in a different radial plane.
Quite simply, the mean bore size is calculated as follows:
This is far more useful when calculating the shaft tolerance than a single bore measurement which might be misleading.
Let’s say that a mean bore deviation tolerance for a P0 bearing is +0/-8 microns. This means that the mean bore can be between 7.992mm and 8.000mm. The same principle applies to the outer ring.
Width Deviation
… or deviation of the single inner or outer ring width from the nominal dimension. Not much explanation is needed here. As with bore and OD dimensions, the width must be controlled within certain tolerances. Since the width is usually less critical, the tolerances are wider than for the bearing bore or OD. A width deviation of +0/-120 means that if you measure the inner or outer ring width at any single point around, say, a 688 (4mm wide) bearing, it should not be wider than 4mm (the nominal dimension) or narrower than 3.880mm.
Variation
Variation tolerances ensure roundness. In this drawing of a badly out-of-round 688 inner ring, the largest measurement is 9.000mm and the smallest 7.000mm. If we calculate mean bore size (9.000 + 7.000 ÷ 2) we come up with 8.000mm. We are within the mean bore deviation tolerance but the bearing would clearly be unusable so you see that deviation and variation can be useless without each other.
Single Bore/OD Variation
…or more accurately, Bore/OD Diameter Variation in a Single Radial Plane (of course, now you know all about single radial planes!). Look at the diagram on the left where the bore measurements are between 8.000mm and 7.996mm. The difference between the largest and smallest is 0.004mm, therefore, the bore diameter variation in this single radial plane, is 0.004mm or 4 microns.
Mean Bore/OD Diameter Variation
Ok, thanks to mean bore/OD deviation and single bore/OD variation, we are happy that our bearing is close enough to the correct size and is round enough but what if there is too much of a taper on the bore or OD as per the diagram on the right (yes, it is greatly exaggerated!). This is why we also have a mean bore and OD variation limits.
To obtain mean bore or OD variation, we record the mean bore or OD in different radial planes and then check the difference between the largest and smallest. Assume that on the left here, the top set of measurements gives a mean bore size of 7.999mm, the middle is 7.997mm and the bottom is 7.994mm. Take the smallest away from the largest (7.999 – 7.994) and the result is 0.005mm. Our mean bore variation is 5 microns.
Width Variation
Again, very straightforward. Let’s assume, for a particular bearing, the permitted width variation is 15 microns. If you were to measure the inner or outer ring width at various different points, the largest measurement should not be more than 15 microns greater than the smallest measurement.
Radial Runout
 …of assembled bearing inner/outer ring is yet another important aspect of bearing tolerances. Suppose the mean deviation for both the inner ring and the outer ring is within limits and the roundness is within the allowed variance, surely that’s all we need to worry about? Look at this diagram of a bearing inner ring. The bore deviation is OK and so is the bore variation but look at how the ring width varies. Like everything else, ring width is not exactly the same at every point around the circumference but radial runout tolerances dictate how much this can vary.
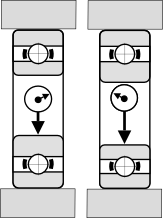 Inner ring runout
… is tested by measuring all points on one circle of the inner ring during one revolution while the outer ring is stationary and taking the smallest measurement away from the largest. These radial runout figures given in the tolerance tables show the maximum variation allowed. The difference in ring thickness here is exaggerated to illustrate the point more clearly.
Outer ring runout
is tested by measuring all points on one circle of the outer ring during one revolution while the inner ring is stationary and taking the smallest measurement away from the largest.
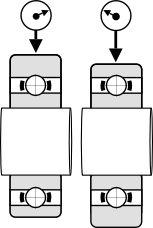
Face Runout/Bore
This tolerance ensures the bearing inner ring surface is close enough to a right angle with the inner ring face. Tolerance figures for face runout/bore are only given for bearings of P5 and P4 precision grades. All points on one circle of the inner ring bore close to the face are measured during one revolution while the outer ring is stationary. The bearing is then turned over and the other side of the bore is checked. Take the largest measurement away from the smallest to get the face runout/bore tolerance.
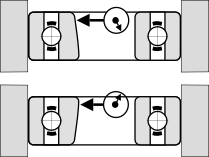
Face Runout/OD
… or variation of outside surface generatrix inclination with face. This tolerance ensures the bearing outer ring surface is close enough to a right angle with the outer ring face. Tolerance figures for face runout/OD are given for P5 and P4 precision grades. All points on one circle of the outer ring bore next to the face are measured during one revolution while the inner ring is stationary. The bearing is then turned over and the other side of the outer ring is checked. Take the largest measurement away from the smallest to get the face runout/OD bore tolerance.
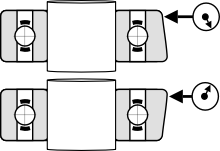
Face Runout/Raceway are very similar but, instead, compare the inclination of the inner or outer ring raceway surface with the inner or outer ring face.

 Địa Chỉ: 260/16 Dương Thị Mười, KP.3A, P.Tân Thới Hiệp, Q.12, T.p- Hồ Chí Minh
 Hotline:


